facebook
twitter
youtube
google_plus
pinterest
  • Home
  • Cabinet Painting
  • Before & After
  • Cabinet Refinishing
  • DIT Cabinet Painting
  • About Us
    • What Our Customers Say
  • Blog
    • Home Selling Tips
  • Contact

How to Install Kitchen Cabinet Hardware

Comment are off

How to Install Kitchen Cabinet Hardware

09 Apr 2018
kate

Newly installed kitchen cabinet hardware

If you’ve decided to take on the DIY project of painting your own kitchen cabinets, then you’ll need to know how to remove and install kitchen cabinet hardware. There are tricks you should know so that your cabinets hang straight and your hinges open smoothly. Here’s how to install kitchen cabinet hardware.
First you need to gather the supplies you’ll need.

  • Drill & drill bits
  • Cabinet jig – you can get these on Amazon or at your hardware store in town
  • Your new hardware – If you don’t know which style or finish to go with, check out this post about all things hinges!

Now that you’ve got what you need to install your cabinet hardware, here are the crucial steps you’ll need to take to do it right.

  1. Remove Your Current Hardware
  2. Of course, you’ll have to remove your current hardware to install the new set. But if you want to keep your old hardware and paint it to change it up then you’ll need to label the cabinet doors and hinges and hardware accordingly. Over time, your hinges move a certain way when cabinet doors are being opened and closed. So if you attach a hinge to a different place, the cabinet won’t open and close properly.
    Person removing the hardware and hinges from a kitchen cabinet

  3. Use Your Cabinet Jig
  4. The cabinet jig is a great little tool to make lining up the hardware holes on your cabinets more accurate a lot easier. Generally, you’ll want to use the same holes as your previous hardware used, so you don’t end up with unused holes all over your cabinets. If you’ve redone your cabinets or have new ones and don’t need to worry about the old holes anymore, then you are free to choose where the hardware holes go now.
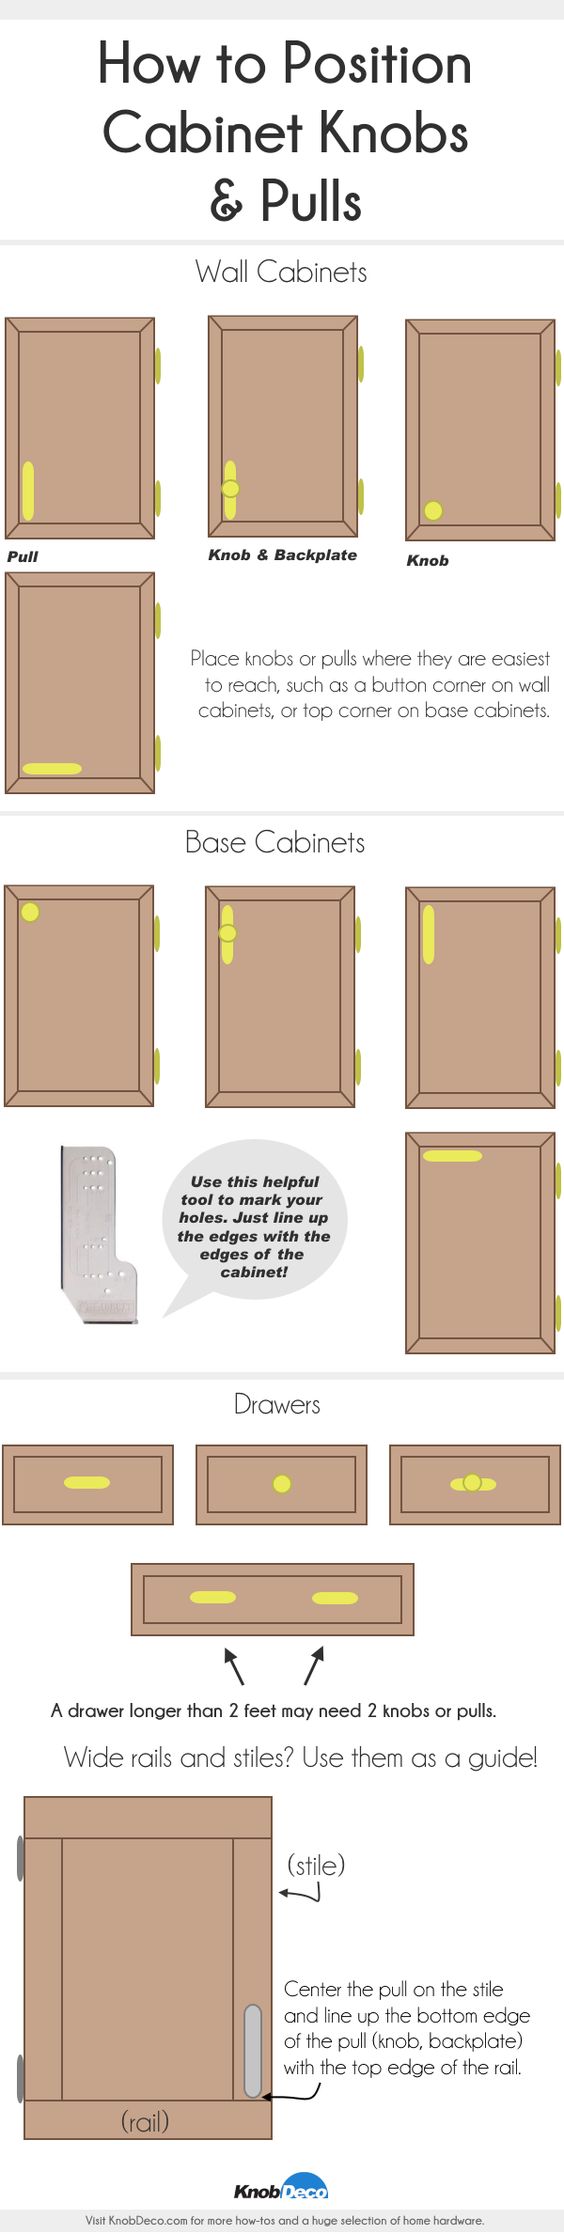
    Not sure where your cabinet hardware should go? Refer to this chart to see what’s best for your kitchen cabinets.
    A chart explaining where to put your cabinet hardware

    Line up your cabinet jig with the cabinet door (your doors should be hanging level in order for this to work). Choose where you want your hardware to go and use the drill bit to drill your holes. Make sure you are using the appropriate size. You don’t want the holes to be too big. Start small to be safe, then gradually increase the size until it’s the right one for your screws.
    A cabinet jig that allows you to make even holes for cabinet hardware

  5. Attach the Hardware
  6. Once the holes are drilled you can insert the screws and attach your hardware. With the cabinet jig, it makes it easy so your knobs and pulls are straight and lined up with each other perfectly.
    New cabinet hardware installed and perfectly straight

  7. Do the Same for the Drawers
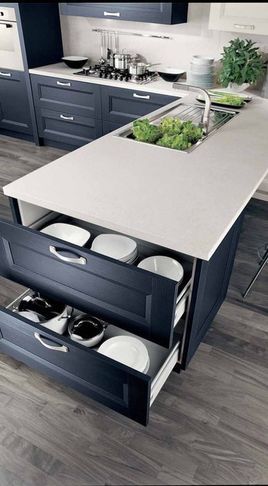
  8. There is a separate cabinet jig for the drawers as well. It works the same way as the cabinet doors one. Align, drill, attach!
    Drawers showing new hardware pulls on them


Sound Finish Professional Cabinet Painting and Refinishing Services

Sound Finish Provides the highest quality cabinet coatings in the industry because cabinet coatings are our primary focus and our specialty. With 20+ years of experience, our unique system paints your kitchen cabinets in 3-4 days!
Learn more and schedule a consultation today!

Social Share

  • google-share

Recent Blog Posts:

kitchen trends to let go of

Kitchen Cabinets Trends On Their Way Out in 2019

25 Nov 2019
lorful Kitchen Cabinets Trending in 2020

Colorful Kitchen Cabinets Trending in 2020

05 Nov 2019
Top 5 Reasons to Hire Sound Finish

Top 5 Reasons to Hire Sound Finish

12 Oct 2019
How To Make Oak Kitchen Cabinets Look Modern

How To Make Oak Kitchen Cabinets Look Modern

26 Sep 2019
Keep Your Kitchen Current with Oak Wood Cabinetry

Keep Your Kitchen Current with Oak Wood Cabinetry

10 Sep 2019

Learn More Kitchen Cabinet Restoration:

  • Bathroom Cabinets
  • Bathroom Remodel
  • Budget
  • Cabinet Maintenance
  • Cabinet MakeOver
  • Cabinet Painting
  • Cabinet Refinishing
  • Cabinet Refinishing Marysville
  • Cabinet Restoration
  • DIY Kitchens
  • DIY Painting
  • Everett Home Show
  • Home Decor
  • Home Selling Tips
  • Home Staging
  • Home Value
  • Kitchen Cabinets
  • Kitchen Decor
  • Kitchen Design
  • Kitchen Remodel
  • Low VOC
  • Paint Colors
  • Pregnancy
  • Seattle Cabinet Painting
  • Seattle Cabinet Refacing
  • Seattle Cabinet Refinishing
  • Seattle Home Show
  • Upcycling
  • Video

Testimonials

“The workmanship is top notch. Thank you for a better job than I could ever ask for.”
RobertArlington, Washington
“Service was prompt, courteous & completed with the highest quality standards. They cleaned up perfectly afterwards, & even finished ahead of schedule.”
KathleenMarysville, WashingtonMarysville, Washington
“(They) did an outstanding job. Quality of job was excellent. Cost was very competitive.
BruceMarysville, WashingtonMarysville, Washington
The best money I ever spent!
Darlene Davis-Porter
My cabinets are 32 years old, after Gleam Guard I use nothing but water to clean them and they look beautiful!
Mrs. Williams
I am not exaggerating when I say it looks like I just spent $15,000 for new kitchen cabinets and misc. wood trim. The kitchen cabinets were originally made to custom fit this house and to have them replaced would have been extremely expensive!
Patricia Hardy

Our Service Areas:

Arlington, Bellevue, Bothell, Burlington, Camano Island, Edmonds, Everett, Duvall, Granite Falls, Issaquah, Kirkland, La Conner, Lake Forest Park, Lake Stevens, Lynnwood, Marysville, Mercer Island, Mill Creek, Monroe, Mount Vernon, Mountlake Terrace, Mukilteo, New Castle, Northgate, Redmond, Sammamish, Seattle, Sedro Woolley, Shoreline, Snohomish, Stanwood, and Woodinville.
Your area not listed here? Give us a call and ask.

Family Owned & Operated

Sound Finish is a family owned and operated business. We treat your home with same care and respect that we would want in our home.

Privacy Policy

Contact Us

  • Joe Clapper, Owner
  • joe@soundfinish.co

Fill Out The Form Below:

logo

Copyright 2019

Designed by Worldlight Media Web Design